A sharp knife is a chef’s best friend. Dull blades not only make meal prep a chore but can also be dangerous. As unintuitive as that may sound, cutting with a dull knife means you have to drive more force behind the handle to slice through the food you’re prepping, increasing the chance of the knife accidentally slipping and injuring you. So, learning how to sharpen a knife with a whetstone (or any other knife sharpener) is a critical skill to have for everyone.
Luckily, with a little know-how and a trusty whetstone, you can keep your knives in top condition. In this article, we’ll guide you through how to sharpen a knife with a whetstone like a pro!
What’s a Whetstone?
Let’s get down to basics: a whetstone is a rectangular block made from abrasive materials like aluminum oxide or silicon carbide. When you grind the edge of your knife’s blade against it, the whetstone’s going to shave off a little bit of metal at the edge, resulting in a well-honed blade by the end.
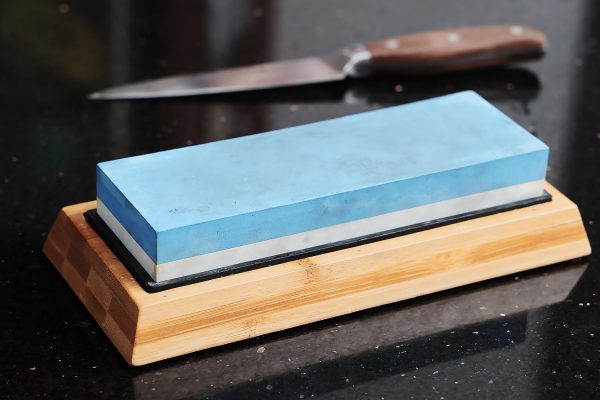
It typically has two sides with different grit levels. The grit levels indicate the size of the abrasive particles – the lower the number, the coarser the grit. The coarser side is great for repairing damage and the finer side with the lower grit level is going to be perfect for honing an excessively dull blade (or if you just want to give your knife a grand touch-up.)
How to Use a Whetstone
There are proper techniques to using a manual whetstone, unlike an automatic knife sharpener where you only need to insert the knife blade into a slot and it should be sharpened in a jiffy. Fortunately, it’s not difficult — you only have to practice a little bit.
Preparing Your Whetstone
Before sharpening, you’ll need to soak the whetstone. We’re not talking about a brief splash and you can get to work right away: this is a 15-20 minute affair. Fill a bucket with tap water and let the whetstone submerge for the whole time.
A whetstone’s structure has a porous structure. When you soak it, the pores are going to be saturated with water, allowing your knife blade to “glide” over the surface rather than getting caught in the tiny chips and cracks on the stone’s surface and chip your blade.
Finding the Right Angle
Soaked and ready to go? Now you’ll need to find the correct angle to grind your blade against the stone.
Maintaining a consistent angle between the blade and the whetstone is the key to a razor-sharp edge. Most kitchen knives require a 20-degree angle on each side. To find this angle, place the blade perpendicular to the stone, then tilt it until it’s halfway to lying flat – this is roughly 20 degrees. Some whetstones come with angle guides to make this step easier (if you’re new to manually knife sharpening, we highly recommend picking whetstones that have these guides.)
Sharpening the Blade
If your blade has become very dull, damaged, or with unsightly nicks in the blade, then start first on the coarser side of the whetstone. With the blade at the correct angle, apply light pressure and draw the knife across the stone from heel to tip, maintaining the angle throughout.
Repeat this motion a few times, then flip the blade over and sharpen the other side. Remember, you’d only be sharpening a single side of the knife’s blade while you’re grinding. Always sharpen both sides evenly to maintain a symmetrical edge, which will cut better.
Honing the Edge
Once you’ve finished with the coarse side, it’s time to use the fine-grit side of the whetstone.
This side is used for honing, which smooths out any burrs or inconsistencies left by the coarser grit. Use the same technique as before, but with even lighter pressure. A few strokes on each side should suffice. Don’t try to polish the blade too much, or your knife blade will develop what’s known as a “rolled blade.”
Basically, if you fine-grind the blade too much, the microscopic teeth of the edge can actually bend, creating a blunted, rolled effect. This will make the knife feel duller than before sharpening, even though a very fine, polished surface may be present.
Testing the Sharpness
To test your newly sharpened knife, try slicing through a sheet of paper. A sharp blade should cut cleanly and effortlessly. If you feel any snags or resistance, go back to the honing stage and give it a few more strokes.
You can also try this with fresh veggies or fruits. The knife should feel buttery as it cuts through the fruit’s skin and flesh!
Conclusion
We’re not going to lie: you’ll need quite a lot of practice to get this down. At first, you may end up with an unevenly sharp blade. But in time, anyone can get the motion down. With proper care and attention to your trusty whetstone, your knives will stay sharp and reliable for years to come!